StoreClerk is designed to start working its magic right out of the box. With a simple installation, StoreClerk will automatically learn your products, and once it’s ready, you can activate your bot in just a click. From there, StoreClerk gets right to work driving sales and engaging your customers!
Of course, we’ve also built in powerful customization options so you can tailor StoreClerk to fit your store’s unique style and brand. Whether it’s tweaking the colors, adjusting the layout, or refining the calls to action, StoreClerk is fully flexible and easy to adapt.
First steps
StoreClerk is great to use out of the box! It trains on your products, learning your catalog and becoming the perfect salesperson for your store.
To get StoreClerk running, this is all you need to do:
- Navigate to StoreClerk in the Shopify Admin.
- Activate the StoreClerk bot.
A few small tweaks can dial things up, and make StoreClerk amazing:
- Customize StoreClerk’s appearance to match your brand.
- Describe your store so that StoreClerk understands your brand perfectly.
- Activate email escalation to ensure customers get help when StoreClerk can’t handle their query.
- Customize StoreClerk’s CTAs for that extra marketing boost.
That’s it! You now have an amazing bot tirelessly selling your products for you.
Managing StoreClerk
StoreClerk blends seamlesslessly into Shopify. You can find everything you need right in the Shopify Admin.
Finding StoreClerk in the Shopify Admin
StoreClerk is easy to find. Just follow these steps:
- Go to your store’s Shopify Admin page.
- Click on Apps in the left-hand menu.
- In the list of installed apps, find and select StoreClerk.
- While you’re at it, pin StoreClerk by clicking the drawing pin icon next to its name. That way you’ll have easy access to it whenever you need it.
Tracking StoreClerk’s Performance
StoreClerk provides real-time insights into your AI assistant’s performance and impact on your store. Our intuitive dashboard gives you at-a-glance visibility into key metrics, helping you understand how StoreClerk is driving engagement and sales.

Understanding Your Dashboard
Usage and Billing
The Charges card shows your current billing cycle usage. StoreClerk starts with a generous monthly credit, and you’ll only be charged for usage beyond that. The dashboard clearly displays your current charges and alerts you if you’re approaching your spending limit. This transparent approach ensures you’re always in control of your costs while maximizing the value StoreClerk brings to your store.
Sales Impact
Track your bot’s direct impact on sales through the Product Views metric. This shows how many times customers have clicked on products recommended by StoreClerk in the current month. It’s a direct measure of how effectively your AI assistant is guiding customers to products they’re interested in purchasing.
Customer Engagement
The Chats counter shows the number of customer interactions initiated in the last hour, giving you real-time visibility into how actively customers are engaging with StoreClerk. This immediate feedback helps you gauge the bot’s impact during peak shopping hours and promotional events.
Store Coverage
StoreClerk automatically builds a comprehensive understanding of your store through two key metrics:
- Products Indexed shows the percentage of your catalog that StoreClerk has learned about. The bot automatically indexes new products within minutes, ensuring it can always recommend your latest offerings.
- Pages Indexed tracks how many of your store’s policy pages (shipping information, return policies, etc.) StoreClerk has incorporated into its knowledge base, enabling it to accurately answer customer service questions.
Initial indexing is lightning-fast, typically completing within 30 minutes even for stores with thousands of products. After that, StoreClerk continuously monitors your store for changes, ensuring it’s always up-to-date with your latest products and policies.
With these comprehensive analytics at your fingertips, you can confidently track StoreClerk’s contribution to your store’s success. The dashboard updates in real-time, allowing you to monitor performance and make informed decisions about your customer service strategy.
Need to adjust your spending limit or understand your usage patterns in more detail? Head over to the billing section to learn how to manage your StoreClerk settings.
Describe Your Store
Provide StoreClerk with a short description of your store and the products you sell. This lets StoreClerk understand your brand, and understand what you find important about your store. A few words go a long way, letting StoreClerk transport your brand in every word it uses.

Bot setup
The “Online Store Chat” panel lets you customize the StoreClerk Bot. To find it, scroll down to Superpowers and you’ll see the Online Store Chat panel.

Customizing the bot’s appearance
The Customize chat button at the top of the panel takes you directly to StoreClerk’s customization options in your store’s theme editor. This lets you activate and deactivate the bot, as well as match its appearance perfectly to your brand.
Tailoring Your CTAs and Copy
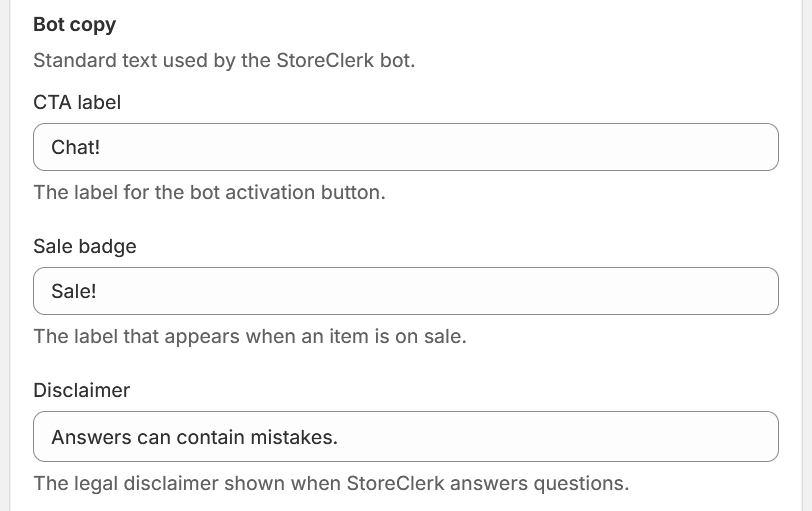
StoreClerk’s text elements can be easily customized to match your brand’s voice and messaging style. These customization options are available in the Bot copy section. You have the following settings:
- CTA label — This is the text that non-sighted customers will here describing the button that customers click to start chatting with StoreClerk. While the default "Chat!" works well, you might want to try something more engaging like "Need Help?", "Ask Me Anything!", or "Get Recommendations".
- Sale badge — When StoreClerk shows product recommendations in a carousel, this text appears on items that are on sale. The default "Sale!" is effective, but you could use alternatives like "Special Offer", "Deal!", or match your store’s usual sale terminology.
- Disclaimer — This text appears below the chat interface. It’s a perfect place to set appropriate expectations about the AI interaction, such as noting that responses may contain mistakes, or adding any legal disclaimers your business requires.
Advanced settings
While most stores won’t need to modify these settings, StoreClerk provides some advanced configuration options for stores with specific technical requirements.
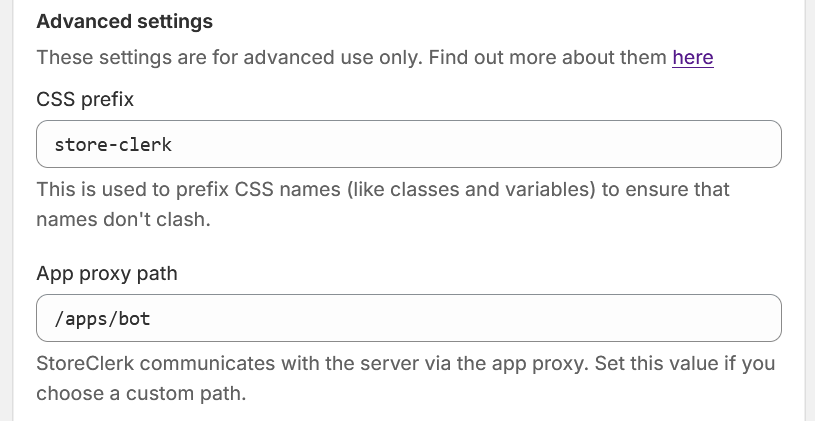
Here are the settings available:
CSS Class Prefix
By default, StoreClerk uses the prefix "store-clerk" for all its CSS classes and IDs to prevent conflicts with your theme’s existing styles. While this works perfectly for the vast majority of stores, you can modify this prefix if you encounter any CSS conflicts with your theme.
Note: Only change this setting if you’re experiencing specific styling conflicts in your theme. Changing the prefix without cause may lead to unexpected behavior.
App Proxy Path
StoreClerk communicates with its backend through
Shopify’s app proxy system, which by default uses the
path /apps/bot. If you’ve modified the app
proxy path in your Shopify admin settings, you’ll need
to update this value to match your custom configuration.
Important: This setting should only be modified if you have explicitly changed the app proxy path in your Shopify admin. Incorrect values will prevent StoreClerk from functioning properly.
These are advanced settings that should only be modified if you understand their implications. If you’re unsure about changing these values, it’s best to leave them at their defaults. If you need assistance with these settings, don’t hesitate to contact our support team.
Escalate to Email
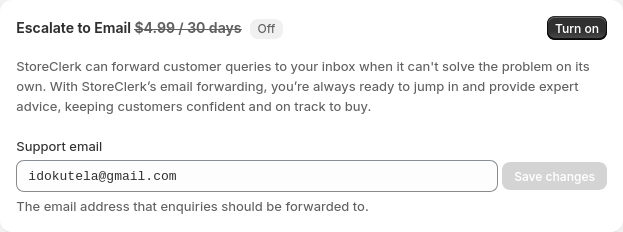
“Escalate to Email” lets StoreClerk send you an email if a customer has an issue they can’t solve! It is included free in the “Pro” and “Enterprise” plans, and costs only $4.99/month if you’re on the “Basic” plan.
To manage “Escalate to Email”, scroll to “Superpowers” and find the panel under the “Online Store Chat” panel. If your plan supports it, you will be able to set the email address that StoreClerk uses, and toggle it on and off.
Managing Your Billing
StoreClerk offers transparent, predictable pricing with flexible spending controls. Our billing system is designed to grow with your business while keeping costs manageable and providing exceptional value for every dollar spent.
Understanding Your Plan
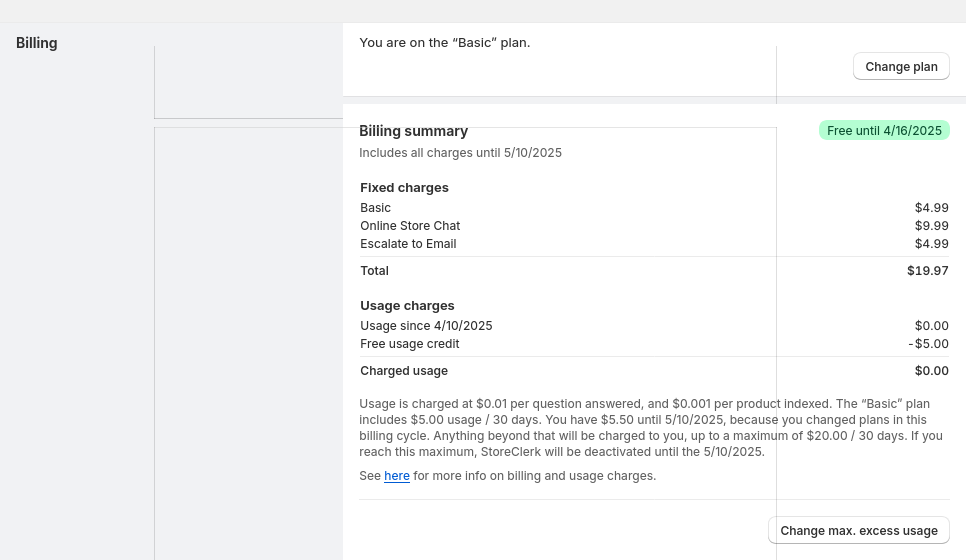
Your billing summary shows all the key details of your StoreClerk subscription at a glance.
- Fixed charges — This includes the price for your subscription as well as any addons, like "Escalate to Email".
- Usage charges — This shows all charges arising from StoreClerk usage. Each plan includes a generous usage credit per 30 days. Any charges beyond this are capped at your maximum usage, that you can set yourself. Please note that StoreClerk becomes deactivated if you reach this maximum charge.
Changing Your Plan
You can change your plan at any time. Simply click on "Change plan". Please note you can only downgrade once per 30 day billing cycle.
Managing Your Costs
StoreClerk puts you in complete control of your spending:
- Monitor your current usage in real-time through the performance dashboard
- Adjust your maximum spend limit at any time (cannot be set below current cycle usage)
- Receive notifications when approaching your spending limit
- Automatic pausing if your limit is reached, ensuring no surprise charges
Investment That Pays Off: At just $0.01 per interaction, StoreClerk typically pays for itself by converting just one or two sales per month. Many stores find their StoreClerk-assisted conversions more than cover their entire annual subscription in the first month alone!
Our plans fit perfectly to your store size. For most stores, the included credit provides more than enough capacity for robust customer service and sales support. As your store grows and StoreClerk drives more sales, you can easily adjust your maximum spend to match your success.
Need help understanding your billing or want to discuss custom plans for high-volume stores? Our support team is always here to help ensure you’re getting the most value from StoreClerk.
Customizing StoreClerk’s appearance
StoreClerk is designed to seamlessly fit into your store’s branding, and customizing it is quick and easy—all done directly within the Shopify theme editor. This means you can adjust the bot’s appearance without any complex setups or coding.
To find StoreClerk in the theme editor, either click the Customize chat button StoreClerk’s admin section, or click on ‘App embeds’ button (shown below) or press Ctrl3. You can then find StoreClerk by scrolling through the apps, or simply enter "StoreClerk" in the search bar to select it directly.

Once inside the editor, you can fine-tune StoreClerk’s colors, layout, and calls to action to make sure the bot matches your brand perfectly. Continue reading below to explore each customization option.
Don’t forget to save your changes when you’re done! When you save them, they will immediately be live on your store.
Activating the StoreClerk Bot
Activating your StoreClerk bot is easy: simply switch the toggle next to StoreClerk on. This will make StoreClerk active and ready to engage with your customers, driving sales and enhancing customer interactions. If at any point you wish to disable the bot, simply toggle the switch off, and StoreClerk will stop appearing on your store until reactivated.

Positioning the Chat Button
StoreClerk’s Chat Button can be freely positioned to make sure it is easy to find on your store.
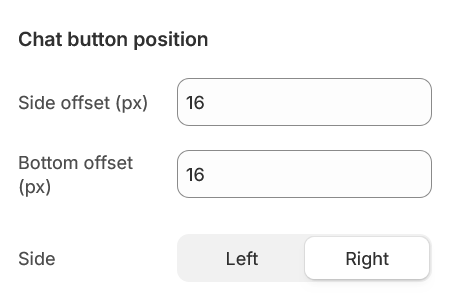
You can customize three key settings:
- Side offset (px) — set how far the button is from the side of the window (in pixels).
- Bottom offset (px) — set how far the button is from the bottom of the window (in pixels).
- Side — choose which side of the window the button and the chat should appear.
Adapting StoreClerk’s Layout
StoreClerk offers flexible layout options to ensure the chat interface perfectly complements your store’s design. All layout settings can be adjusted directly in the theme editor, allowing you to preview changes in real-time.
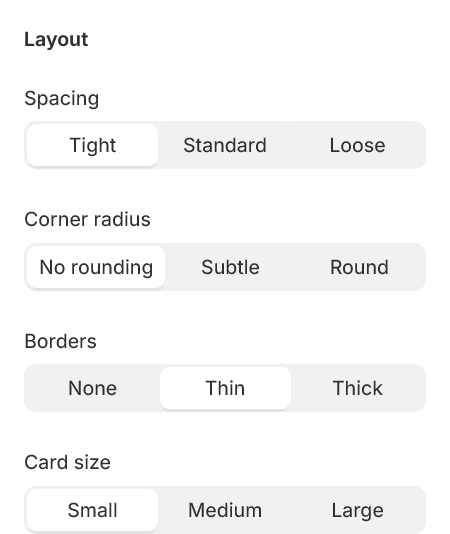
You can customize four key aspects of StoreClerk’s layout:
-
Spacing — Choose between three spacing
options:
- Tight — Creates a compact, space-efficient layout
- Standard — Provides balanced, comfortable spacing
- Loose — Offers more breathing room between elements
-
Corner Radius — Adjust how rounded the
corners appear:
- No rounding — Sharp corners for a modern, minimalist look
- Subtle — Slightly rounded corners for a soft touch
- Round — Fully rounded corners for a friendly, approachable feel
-
Borders — Select your preferred border
style:
- None — Clean, borderless design
- Thin — Subtle borders for gentle definition
- Thick — Bold borders for stronger visual presence
-
Card Size — Choose the overall size of the
chat interface:
- Small — Minimal footprint, perfect for compact layouts
- Medium — Balanced size suitable for most stores
- Large — Expanded size for prominence and readability
Experiment with different combinations of these settings to find the perfect layout that aligns with your store’s aesthetic. The changes are instantly visible in the preview, making it easy to fine-tune the appearance until it’s just right.
Picking the Perfect Colors
StoreClerk’s color system is designed to be both flexible and foolproof, ensuring your bot looks great while matching your brand’s color scheme perfectly. All color settings can be adjusted right in the theme editor, with live preview to help you make the perfect choice.
Basic Colors
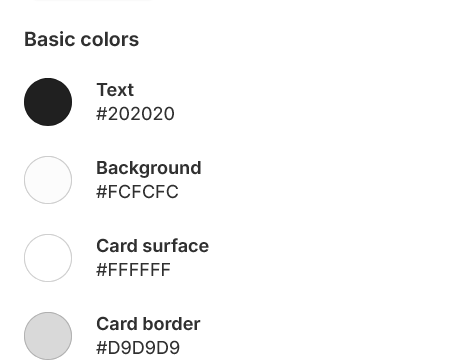
The basic color settings define the fundamental visual hierarchy of the interface:
- Text — Sets the color for all standard text in the chat interface, including messages, product titles, and descriptions. This should be a color that ensures comfortable reading.
- Background — Determines the color behind the entire chat interface. This color helps define StoreClerk’s presence on your page while ensuring content remains easily readable.
- Card Surface — Controls the color of message bubbles, product cards, and other contained elements. This color creates visual separation between different pieces of content.
- Card Border — Defines the border color around cards and messages. This subtle detail helps structure the interface and define boundaries between elements.
Accent Colors
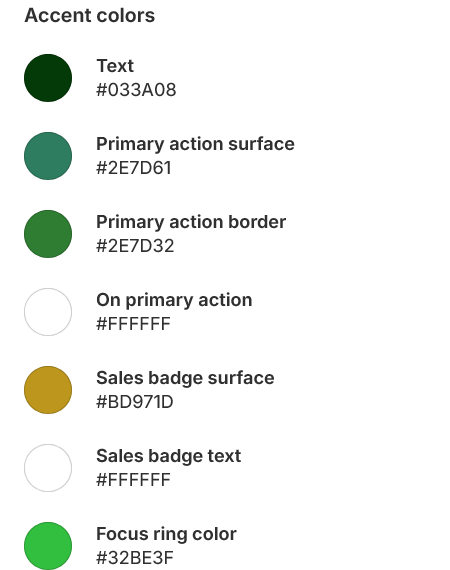
Accent colors define the interactive and attention-grabbing elements of StoreClerk:
- Accent Text — Used for clickable text, links, and important information that needs to stand out from regular content. This color guides users to interactive elements.
- Primary Action Surface — The background color of main buttons and calls to action. This is one of the most important colors for driving engagement.
- Primary Action Border — Creates depth and definition around buttons. Usually a slightly darker shade of your primary action color for a cohesive look.
- On Primary Action — The color of text that appears on buttons. Should provide strong contrast with the button background for optimal readability.
- Sales Badge Surface — The background color for badges highlighting sale items. This should be distinct from your primary action colors to help sales stand out.
- Sales Badge Text — The color of text within sale badges. Needs to contrast well with the badge background while maintaining your brand aesthetic.
- Focus Ring Color — Appears when elements are selected or focused. Critical for accessibility and helping users track their interactions.
When choosing your colors, consider these tips:
- Align your primary action colors with your store’s main call-to-action buttons for consistency
- Maintain strong contrast ratios between text and background colors to ensure readability
- Use your brand’s accent color for interactive elements to create a cohesive experience
- Make sale badges visually distinct to help them capture attention
The color picker makes it easy to experiment with different combinations. You can either use the visual picker or enter specific hex codes to match your brand colors exactly. All changes preview instantly, so you can perfect your color scheme with confidence.